Table of Contents
For some GME applications, the only motivation for a modeling project is the desire to describe a system in a structured way and to use the description as a form of interpersonal communication. Usually, however, we also want the computer to be able to process data from the model automatically. Typical processing tasks range from the simple to the sophisticated:
running queries, generating lists, and writing reports based on the contents of the model
generating program code or system configuration
building models automatically from information provided by another data source (e.g. a database)
using the models as a data exchange format to integrate tools that are incompatible with each other
A common theme for all these applications is that they require programmatic access to the GME model information. To meet this requirement, GME provides several ways to create programs that access its data. The most popular technique is writing a GME interpreter. Interpreters are not standalone progams; they are components (usually DLLs) that are loaded and executed by GME upon a user's request. Other types of programs that can access model data are standalone applications (which can be executed without the GME GUI) and other integrated components that serve different purposes (Plugins and AddOns).
There are also different technologies available to access GME data:
Most GME components are built for the Builder Object Network (BON), a framework which is relatively easy to use and is still powerful enough for most applications. BON provides a network of C++ objects. Each of these represents an object in the GME model database. C++ methods provide convenient read/write access to the objects' properties, attributes, and relations.
GME is a COM/DCOM-based architecture. Therefore, COM is the primary interface used to access GME data. It is also the most efficient interface. However, in addition to COM programming, writing a raw COM component requires taking care of the full GME interface protocol, including transactions, territories, event handling, etc.
The GME Unified Data Model module (UDM-GME) creates interpreters that use an automatically generated paradigm-dependent programmatic interface.
Builder Object Network II (BON II) is a newer way to write C++ based interpreters. BON II scales better than BON in case of large models, because an intelligent fetch mechanism only fetch objects just one time and on-demand.
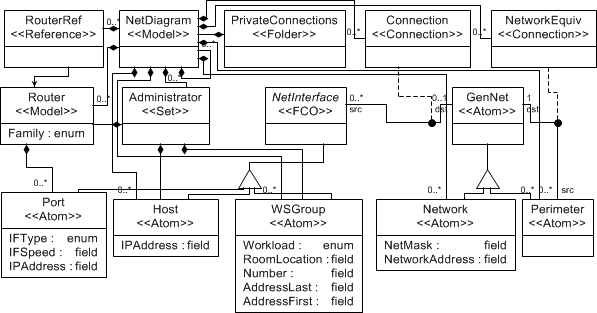
This lesson discusses the process of building a Builder Object Network-based interpreter (not the BON II). The application domain and paradigm are those used in the previous lesson. Our interpreter will complete a simple task: it will print out a list of all routers, along with their ports and IP addresses.
As mentioned above, the job of the Builder Object Network is to
instantiate C++ objects for each of the objects in the GME model tree.
Access to the objects, and to the relationships between them, are
available through methods that act on these objects. Class names and
method names are often self-explanatory: CBuilderAtom,
CBuilderConnection, GetAttribute( ),
SetAttribute( ), GetChildren( ),
GetParent( ), CreateNewAtom( ), etc. The main
BON header file, Builder.h, is the authentic
repository of the BON interfaces.
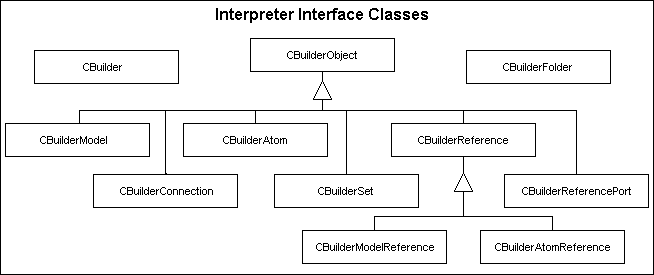
The BON class hierarchy is shown in Figure 1, “Classes in the Builder Object Network”.
Many of the classes are organized into a hierarchy with the common
baseclass CBuilderObject. This class represents the common
functionality available for all FCOs, while the specialized versions
provide object-type specific methods. CBuilderAtom,
CBuilderModel, and CBuilderConnection represent
atoms, models, and
connections, all well-known from the previous
lessons. CBuilderReference (along with the specialized
versions, CBuilderAtomReference and
CBuilderModelReference) and CBuilderSet
represent references and sets,
which are discussed in Lesson 4.
CBuilderReferencePort is a pseudo-object that is only present
in the BON.
Two other classes are "outsiders" to the CBuilderObject
hierarchy. CBuilder represents the modeling project as a
whole. It provides access to the root folder and to other folders, as well
as to project-wide settings (such as GetProjectName( )).
CBuilderFolder represents folders and is capable of
navigating the folder hierarchy and accessing root FCOs.
This tutorial does not attempt to explain the entire BON interface.
Most methods listed in Builder.h are
self-explanatory. However, the GME User's Manual does contain a detailed
description of the Builder Object Network.
Looking at the Builder.h file, it is obvious
that this framework relies quite heavily on certain data types and
templates not listed in Fig 3.1, such as CString,
CTypedPtrList<>, CTypedPtrMap<>,
etc. These are not defined by the BON framework, but by MFC, a popular
class library provided with Microsoft Visual Studio. Please consult the MS
Visual Studio / MFC documentation for help with these data types. Also,
you will notice that a typical instruction pattern is used to navigate the
collection attributes:
POSITION pos = list.GetHeadPosition(); while(pos) { process(list.GetNext(pos)); } The Builder Object Network also provides an optional user-defined subclassing mechanism based on the factory design pattern. BON classes allow subclassing, and user-defined subclasses can be registered into the BON class factory. When this happens, the object network is not built from the predefined classes in Fig 3.1, but from the user's own subclasses, which include additional functionality.
The Builder Object Network is provided as part of a convenient framework, which includes a set of tools (or "wizards") that help the user to set up a component development project. Thanks to this framework, the process of creating an interpreter is both easy and quick. Even casual component developers can build meaningful interpreters within 30-60 minutes.
The first time you wish to create a BON interpreter, you must run
C:\Program Files\GME\SDK\BON\Wizard\setup90.js.
This registers the GME project types in Visual Studio.
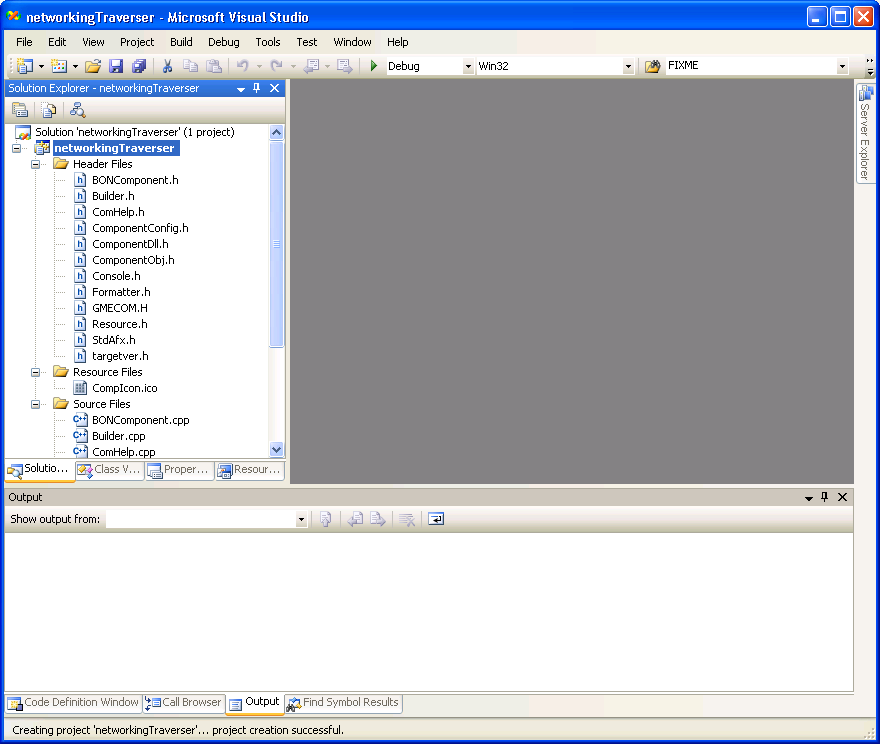
To create a BON project, open Visual Studio. Go to . Under , select , then GME BON Component. Give the project a name (in this case networkingTraverser), then hit OK. Hit Next >. Under Paradigms, enter the name of the metamodel, networking.
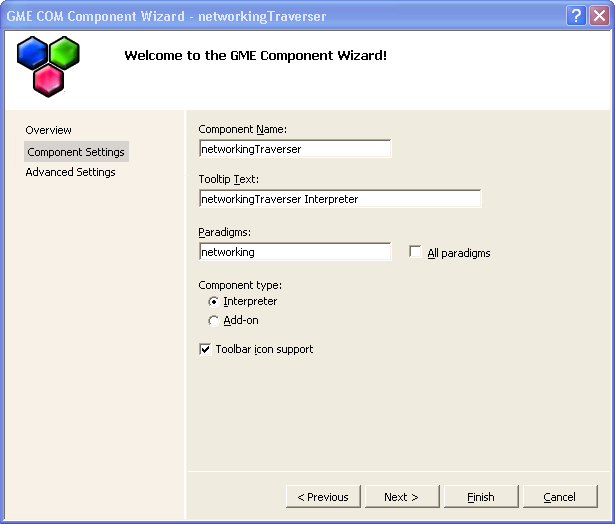
Hit Finish. You now have a GME BON
interpreter; go ahead and build it. As part of the build process, the
interpreter will be registered.
Now, run GME and open a networking model. There should be an icon for the interpreter in the Components toolbar next to the general Interpret ('i") button. You may also run the interpreter by right-clicking a model in the Model Browser and clicking .

Our final task consists of writing the crucial portion of the interpreter code. Like any other program, the difficulty of this task depends on the complexity of the functionality. Most interpreters implement at least two typical functions:
- Navigating the object network
usually, traversing all or part of the tree. Containment is the most frequently used relationship for traversal, although other relationships (inheritance, references, or connections) also provide the ability to navigate in both directions. If the paradigm is recursive, traversal is also implemented by a potentially recursive chain of method calls.
Navigation can begin from several different points, all of which are passed to
CComponent::InvokeExas parameters. These points are:The
CBuilderobject, which represents the entire project and provides access to the root folder, the hierarchy of subfolders (see Lesson 4), and the FCOs contained in them.The focus object (if non-null), i.e. the model from which the interpreter was executed.
The list of selected objects, which is created only when the interpreter is started from the context menu; otherwise, the list is empty.
The most frequently used methods for navigation are:
GetRootFolder( ),GetFolders( ), andGetFolder(name)in theCBuilderclassGetSubFolders( ),GetRootModels( ), andGetRootModel(name)in theCBuilderFolderclassGetChildren( ),GetAtoms( ),GetModels( ),GetReferences( ),GetSets( ), andGetConnections( )in theCBuilderModelclass, along with the variations on these methods that filter the objects by kindnameGetInConnections( ),GetInConnectedObjects( ),GetDirectInConnections( ), and similar functions for navigating connections, plusGetType( )andGetDerivedObjects( )for navigating inheritance, all in theCBuilderObjectclass
Consult
Builder.hfor a full list of methods.- Querying or modifying individual objects
accessing object properties (e.g. name, position), attributes, metainformation, or associations. The function of interpreters typically involves printing out object data in some particular order and format, just like this example. The most frequently used methods for this function are in the
CBuilderObjectclass. They are:GetAttribute( )andSetAttribute( )in several variations, depending on attribute data typeGetName( ),SetName( ),GetLocation( ), andSetLocation( )for accessing propertiesGetRegistryValue( )andSetRegistryValue( )for accessing visualization informationGetKindName( ),GetPartName( ), andGetAttributeNames( )for accessing metainformation
The operation of this particular interpreter should not depend on
the focus object or on selected objects (which may be NULL
in certain situations). Therefore, we must traverse the object tree
through the root of the object hierarchy. The paradigm does not allow
subfolders, so it is relatively easy to travel through all the root
models in the diagram.
In BONComponent.cpp, insert:
void CComponent::InvokeEx(CBuilder &builder,CBuilderObject *focus, CBuilderObjectList &selected, long param)
{
  using namespace GMEConsole;
  Console::Out::WriteLine("Interpreter started...");

  Console::Out::WriteLine(CString("Router list for network") + builder.GetRootFolder()->GetName());
  const CBuilderModelList *diags = builder.GetRootFolder()->GetRootModels();
  POSITION pos = diags->GetHeadPosition();
  while(pos)
  {
    CBuilderModel *diagram = diags->GetNext(pos);
    ProcessDiagram(diagram);
  }
}
InvokeEx demonstrates the basic tricks of traversing
the BON network: accessing child objects and iterating through
collections. The only difference between it and
CComponent::ProcessDiagram is that the latter is recursive
and processes different children in a different way.
void CComponent::ProcessDiagram(CBuilderModel *d)
{
  using namespace GMEConsole;
  ASSERT(d->GetKindName() == "NetDiagram");
  const CBuilderModelList *diags = d->GetModels("NetDiagram");
  POSITION pos = diags->GetHeadPosition();
  while(pos) ProcessDiagram(diags->GetNext(pos)); // recursion

  const CBuilderModelList *routers = d->GetModels("Router");
  pos = routers->GetHeadPosition();
  while(pos) ProcessRouter(routers->GetNext(pos));
}
ProcessDiagram is fairly complex, even though we
managed to squeeze the iteration loops into a single line. Together, the
two methods above provide a nearly complete implementation of the
traversal function of the interpreter, the part
that locates routers in the hierarchy. The ProcessRouter
method takes care of the rest; it implements the node
processing function, as well as some minimal traversal into
the ports of a router.
void CComponent::ProcessRouter(CBuilderModel *r)
{
  ASSERT(r->GetKindName() == "Router");
  CString fam;
  r->GetAttribute("Family", fam);
  Console::Out::WriteLine(CString("\tRouter ") + r->GetName() + " (" + fam + ")");

  const CBuilderAtomList *ports = r->GetAtoms("Port");
  POSITION pos = ports->GetHeadPosition();
  while(pos)
  {
    CBuilderAtom *port = ports->GetNext(pos);
    CString iftype, ipaddr;
    int ifspeed;
    port->GetAttribute("IFType", iftype);
    port->GetAttribute("IFSpeed", ifspeed);
    port->GetAttribute("IPAddress", ipaddr);
    Console::Out::WriteLine(CString("    \t\tPort ") + Formatter::MakeObjectHyperlink(port->GetName(), port->GetObjId()) +
      "(" + iftype + "; " + CComVariant(ifspeed) + "Kbps), Addr: " + ipaddr );
  }
}
Do not forget to add ProcessDiagram and
ProcessRouter to the CComponent declaration in
BONComponent.h. Add #include "Formatter.h" to BONComponent.cpp
The compilation should run smoothly unless there are typos in your
code. If you encounter assertions when running the interpreter for the
first time, make sure that you used the exact same names (kindnames,
rolenames and attribute names) in your paradigm that you are using in
your interpreter code. For reference, here are my copies of BONComponent.cpp
and BONComponent.h.
To create a BON2 project, follow the directions in the section called “Generate a workspace”, but select BON2 project instead of BON.
Frequently-used methods for navigation are:
project->getRootFolder()->getRootFCOs(): returns astd::set<BON::FCO>, the FCOs in the top-level folder (commonly models)getChildFolders(),getChildAtoms(),getChildModels()inBON::FolderImplgetChild*sinBON::ModelImplgetReferred()inBON::ReferenceImplgetMembers()inBON::SetImplgetSrc(),getDst()inBON::ConnectionImpl
The get*s() methods return STL collections.
Here are example files: BON2Component.cpp
and BON2Component.h.
BON2 Extended allows you to write paradigm-specific interpreters more easily. Classes are generated for model elements using the BONExtender interpreter.
To start, create a project as you did with BON2. Create a copy of
the paradigm (networking.mga) in the directory with
the source files. Then open the paradigm in GME and use the BONExtender
interpreter (X icon).
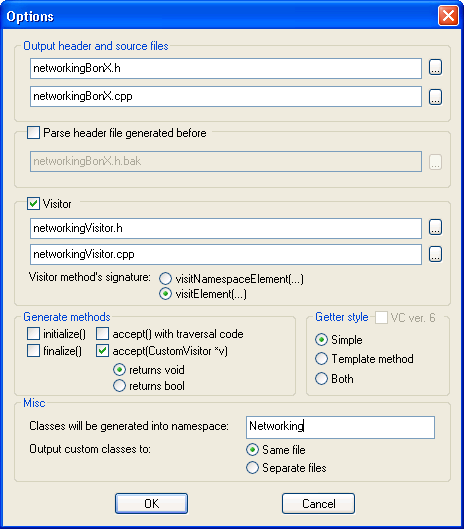
Add the generated files networkingBonX.cpp,
networkingBonX.h,
networkingVisitor.cpp, and
networkingVisitor.h to the Visual Studio
project.
With BON2, you can extend the classes (e.g. NetDiagram) with domain-specific functions. The BONExtender interpreter can also generate visitor code which simplifies the traversal of the model.
The following code iterates through the top-level models (i.e. the models under the root folder):
std::set<BON::Model> rootModels = project->getRootFolder()->getChildModels();
for (std::set<BON::Model>::iterator it = rootModels.begin(); it != rootModels.end(); it++) {
}
Child FCOs can be retrieved from a model by type:
BON::Model diagram;
std::set<BON::FCO> childModels = diagram->getChildFCOs("Router");
for (std::set<BON::FCO>::iterator it = childModels.begin(); it != childModels.end(); it++) {
 ProcessRouter(BON::Model(*it));
}
Attributes:
BON::Atom port;
std::string iftype = port->getAttribute("IFType")->getStringValue();
int ifspeed = port->getAttribute("IFSpeed")->getIntegerValue();
std::string ipaddr = port->getAttribute("IPAddress")->getStringValue();
Connections:
BON::Atom port;
// Print the other end of all Connections
std::set<BON::Connection> conns = port->getConnLinks();
for (std::set<BON::Connection>::iterator it2 = conns.begin(); it2 != conns.end(); it2++) {
BON::ConnectionEnd other;
if ((*it2)->getDst() == *it) {
other = (*it2)->getSrc();
} else {
other = (*it2)->getDst();
}
// A ConnectionEnd is either an FCO or a ReferencePort
if (BON::FCO(other)) {
BON::FCO otherFCO(other);
Console::Out::WriteLine(CString(" Connected to ") +
otherFCO->getObjectMeta().name() + " " + MakeHyperlink(otherFCO));
}
}Here are example files: BON2Component.cpp
and BON2Component.h.