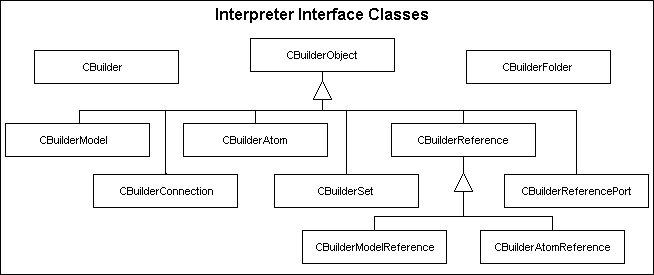
Fig 3.1 Classes in the Builder Object Network
Introduction to Lesson 3
3.1 The Builder Object Network (BON)
3.2 Creating a new component
3.3 Writing the interpreter code
For some GME applications, the only motivation for a modeling project is the desire to describe a system in a structured way and to use the description as a form of interpersonal communication. Usually, however, we also want the computer to be able to process data from the model automatically. Typical processing tasks range from the simple to the sophisticated:
There are also different technologies available to access GME data:
As mentioned above, the job of the Builder Object Network is to instantiate C++ objects for each of the objects in the GME model tree. Access to the objects, and to the relationships between them, are available through methods that act on these objects. Class names and method names are often self-explanatory: CBuilderAtom, CBuilderConnection, GetAttribute( ), SetAttribute( ), GetChildren( ), GetParent( ), CreateNewAtom( ), etc. The main BON header file, Builder.h, is the authentic repository of the BON interfaces.

The BON class hierarchy is shown in Fig 3.1. Many of the classes are organized
into a hierarchy with the common baseclass CBuilderObject. This class
represents the common functionality available for all FCOs, while the
specialized versions provide object-type specific methods. CBuilderAtom,
CBuilderModel, and CBuilderConnection represent atoms, models,
and connections, all well-known from the previous lessons.
CBuilderReference (along with the specialized versions,
CBuilderAtomReference and CBuilderModelReference) and CBuilderSet
represent references and sets, which are discussed in
Lesson 4. CBuilderReferencePort is a pseudo-object that is only
present in the BON.
Two other classes are "outsiders" to the CBuilderObject hierarchy. CBuilder represents the modeling project as a whole. It provides access to the root folder and to other folders, as well as to project-wide settings (such as GetProjectName( )). CBuilderFolder represents folders and is capable of navigating the folder hierarchy and accessing root FCOs.
This tutorial does not attempt to explain the entire BON interface. Most methods listed in Builder.h are self-explanatory. However, the GME User's Manual does contain a detailed description of the Builder Object Network.
Looking at the Builder.h file, it is obvious that this framework relies quite heavily on certain data types and templates not listed in Fig 3.1, such as CString, CTypedPtrList<>, CTypedPtrMap<>, etc. These are not defined by the framework, but by MFC, a popular class library provided with Microsoft Visual Studio. Please consult the MS Visual Studio / MFC documentation for help with these data types. Also, you will notice that a typical instruction pattern is used to navigate the collection attributes:
POSITION pos = list.GetHeadPosition(); while(pos) { process(list.GetNext(pos)); }The Builder Object Network also provides an optional user-defined subclassing mechanism based on the factory design pattern [ref]. BON classes allow subclassing, and user-defined subclasses can be registered into the BON class factory. When this happens, the object network is not built from the predefined classes in Fig 3.1, but from the user's own subclasses, which include additional functionality.
The Builder Object Network is provided as part of a convenient framework, which includes a set of tools (or "wizards") that help the user to set up a component development project. Thanks to this framework, the process of creating an interpreter is both easy and quick. Even casual component developers can build meaningful interpreters within 30-60 minutes.
Let's see if this is true...
3.2.1 Generate a workspace
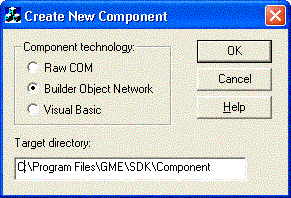
The easiest way to create components is to use CreateNewComponent.exe, a program that generates and initializes a ready-to compile Visual Studio workspace (Fig 3.1). You can start it from the \bin directory of the GME folder (e.g. Program Files\GME\bin\CreateNewComponent.exe)

This program unpacks the necessary files for the selected component technology.
Specify Builder Object Network and a suitable directory, and click OK. A message
box reports the number of files extracted, and a second program,
ConfigureComponent.exe, is initialized just before CreateNewComponent
terminates.
3.2.2 Specify information
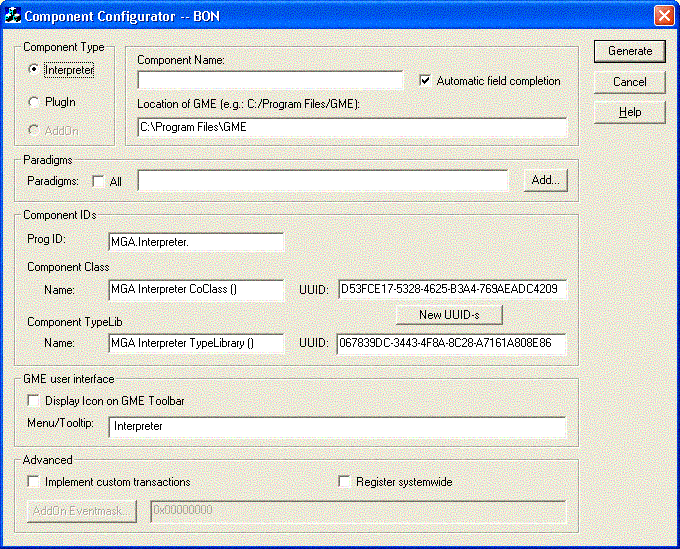
ConfigureComponent.exe (shown in Fig 3.3) is actually one of the files that was extracted in the previous step. It specifies the identification and registration information for the new component. While CreateNewComponent is normally used just once during this process, ConfigureComponent can be run again whenever something needs to be changed.

Many of the fields in ConfigureComponent are automatically generated from the
component name, so we will only need to specify four things:
3.2.3 Execute the component
Open the Visual Studio workspace, "Component.dsw".
A source file, Component.cpp, is opened along with the workspace. Most of the other files in the project are not meant to be modified (and are protected with a read-only attribute). But this file and its header, Component.h, are just "skeletons", code modules that we will modify in order to implement the specific component logic.
Let us test the component as it currently exists. Execute "Build" (F7). The project should compile smoothly. (If a problem occurs, the most likely cause is that the GME interface directory is not specified correctly.)
Since the component is not a standalone program, it cannot be executed directly. Start GME and open a project based on the "networking" paradigm. If "networking" was contained in the "Paradigms" field in ConfigureComponent, the interpreter should be immediately available. There are several ways to start it:
Upon execution, the interpreter displays a message box containing the name of the root folder, exactly as dictated in the CComponent::InvokeEx method in the Component.cpp file. We will implement the interpreter by changing this method and possibly extending CComponent.
The framework has been set up, and the interpreter is running correctly. Our final task consists of writing the crucial portion of the interpreter code. Like any other program, the difficulty of this task depends on the complexity of the functionality. Most interpreters implement at least two typical functions:
#include <fstream.h>InvokeEx demonstrates the basic tricks of traversing the BON network: accessing child objects and iterating through collections. The only difference between it and CComponent::ProcessDiagram is that the latter is recursive and processes different children in a different way.
static ofstream outf;
void CComponent::InvokeEx(CBuilder &builder,CBuilderObject *focus, CBuilderObjectList &selected, long param) {
outf.open("netlist.lst");
outf << "Router list for network" << builder.GetRootFolder()->GetName() << endl;
const CBuilderModelList *diags = builder.GetRootFolder()->GetRootModels();
POSITION pos = diags->GetHeadPosition();
while(pos) {
CBuilderModel *diagram = diags->GetNext(pos);
ProcessDiagram(diagram);
}
outf.close();
}
void CComponent::ProcessDiagram(CBuilderModel *d) {ProcessDiagram is fairly complex, even though we managed to squeeze the iteration loops into a single line. Together, the two methods above provide a nearly complete implementation of the "traversal" function of the interpreter, the part that locates routers in the hierarchy. The ProcessRouter method takes care of the rest; it implements the "node processing" function, as well as some minimal traversal into the ports of a router.
ASSERT(d->GetKindName() == "NetDiagram");
const CBuilderModelList *diags = d->GetModels("NetDiagram");
POSITION pos = diags->GetHeadPosition();
while(pos) ProcessDiagram(diags->GetNext(pos)); // recursion
const CBuilderModelList *routers = d->GetModels("Router");
pos = routers->GetHeadPosition();
while(pos) ProcessRouter(routers->GetNext(pos));
}
void CComponent::ProcessRouter(CBuilderModel *r) {Do not forget to add ProcessDiagram and ProcessRouter to the CComponent declaration in Component.h. It is not particularly useful to define these functions as methods; normal C-style functions will suffice. The same is true for our static file variable outf, which could just as well have been declared as a CComponent (static or non-static) member.
ASSERT(r->GetKindName() == "Router");
CString fam;
r->GetAttribute("Family", fam);
outf << "\tRouter " << r->GetName() << " (" << fam << ")" << endl;
const CBuilderAtomList *ports = r->GetAtoms("Port");
POSITION pos = ports->GetHeadPosition();
while(pos) {
CBuilderAtom *port = ports->GetNext(pos);
CString iftype, ipaddr;
int ifspeed;
port->GetAttribute("IFType", iftype);
port->GetAttribute("IFSpeed", ifspeed);
port->GetAttribute("IPAddress", ipaddr);
outf << "\t\tPort " << port->GetName();
outf << "(" << iftype << "; "<< ifspeed << "Kbps), Addr: " << ipaddr << endl;
}
}
The compilation should run smoothly unless there are typos in your code. If you encounter assertions when running the interpreter for the first time, make sure that you used the exact same names (kindnames, rolenames and attribute names) in your paradigm that you are using in your interpreter code. For reference, here are my copies of Component.cpp and Component.h.
After running the interpreter and verifying that it works, check the time. In less than 30 minutes, we have built our first interpreter!
| << Previous Lesson | Complete List | Next Lesson >> |